> Setting Up Two-Factor Authentication on VMware Horizon View
Setting Up Two-Factor Authentication on VMware Horizon View
This guide shows how you can set up VMware Horizon View two-factor authentication (2FA) via RADIUS using the Protectimus multi-factor authentication system.
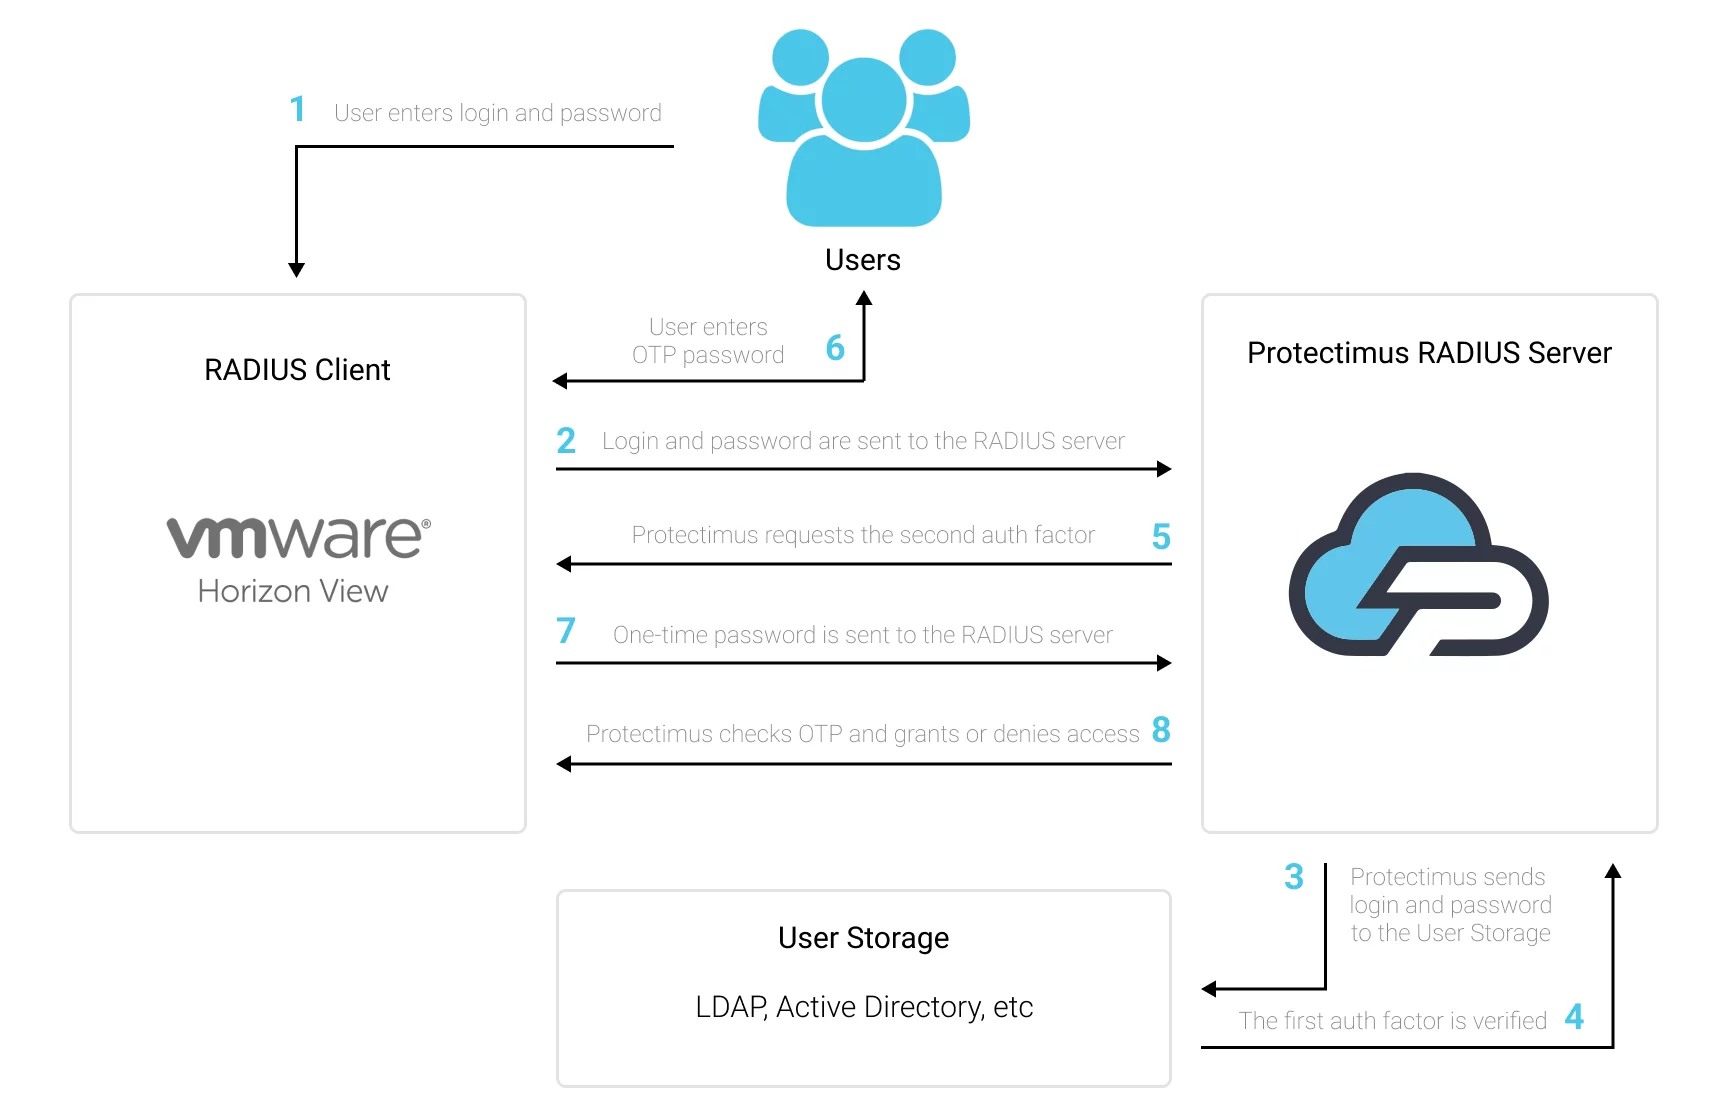
Protectimus two-factor authentication system integrates with VMware Horizon View via RADIUS authentication protocol. In this scenario, the Protectimus Cloud 2FA Service or On-Premise 2FA Platform takes the role of a RADIUS server via a special connector Protectimus RADIUS Server, and the VMware Horizon View performs as a RADIUS client.
The Protectimus RADIUS Server connector transfers authentication requests from the VMware Horizon View to the Protectimus multi-factor authentication (MFA) server and returns the answer permitting or denying access.
Below is an example of integration of the Protectimus 2FA solution with VMware Horizon View.
1. How to Enable Two-Factor Authentication for VMware Horizon View
You can set up multi-factor authentication (2FA) for VMware Horizon View with Protectimus using the RADIUS protocol:
- Get registered with Protectimus SAAS Service or install the On-Premise 2FA Platform and configure basic settings.
- Install and configure Protectimus RADIUS Server.
- Add Protectimus as RADIUS Server for VMware Horizon View.
2. Get Registered and Configure Basic Protectimus Settings
- Register with the Protectimus Cloud Service and activate API or install the Protectimus On-Premise Platform (if you install Protectimus Platform on Windows, check the RProxy box during the installation).
- Add Resource.
- Add Users.
- Add Tokens or activate Users’ Self Service Portal.
- Assign Tokens to Users.
- Assign Tokens with Users to the Resource.
3. Install and Configure Protectimus RADIUS Server
Detailed instructions for installing and configuring the Protectimus RADIUS Server for VMware Horizon View two-factor authentication using RADIUS are available here.4. Add Protectimus as RADIUS Server for VMware Horizon View 2FA
- Log into the VMware Horizon View admin panel.
- Navigate to Settings and then click Servers.
- Select the Connection Servers tab.
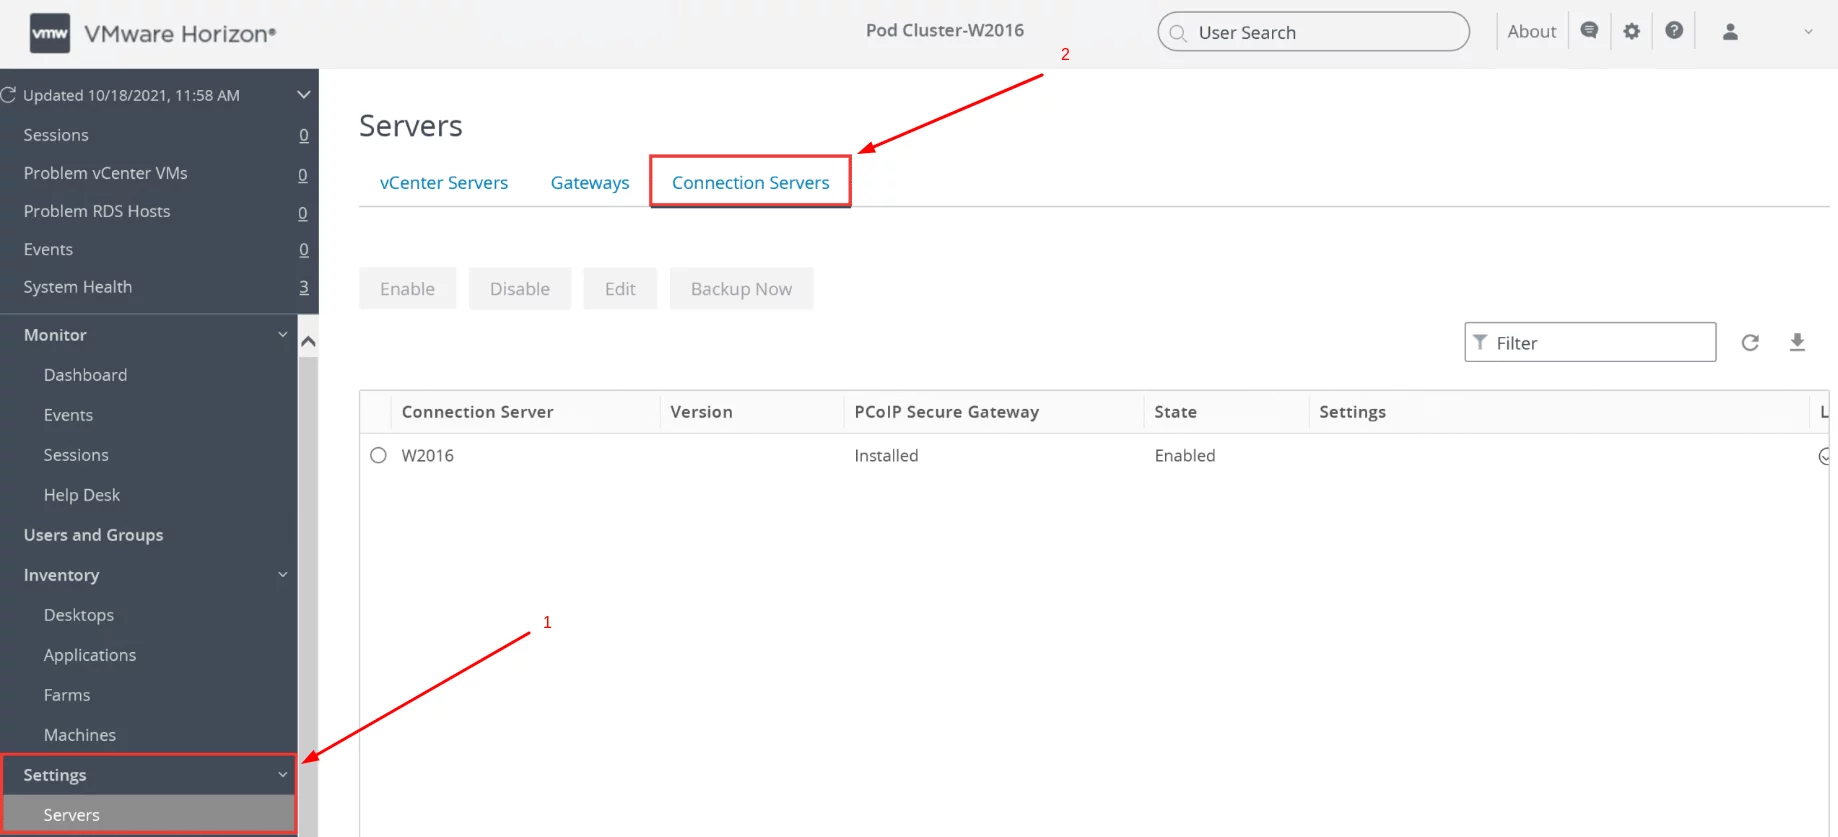
- Select the necessary connection server, and after that click the Edit button.

- Navigate to the Authentication tab.
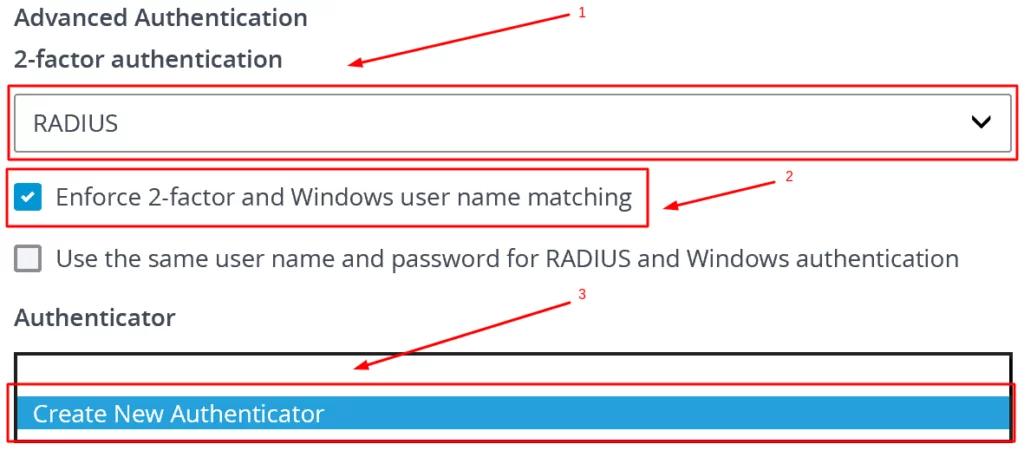
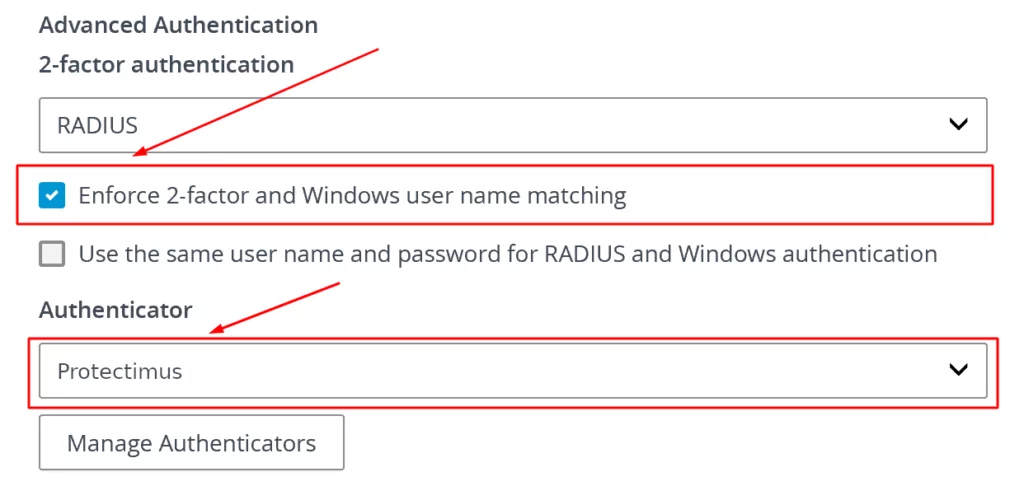
- Then go to the Advanced Authentication section and select RADIUS in the 2-factor authentication dropdown.
- Check the box Enforce 2-factor and Windows user name matching.
- Find the Authenticator dropdown, and select Create New Authenticator.
- You will see an Add RADIUS Authenticator form. Navigate to the Client Customization page and enter any name for your new RADIUS server (e. g. Protectimus). Then click Next.
- On the Primary Authentication Server page, fill in the required information referring to the table and image below.
| Hostname/Address | Enter the IP of server where the Protectimus RADIUS Server component is installed. |
| Authentication Port | Indicate 1812 (or whichever port you configured in the Protectimus radius.yml file when configuring Protectimus RADIUS Server). |
| Accounting Port | Leave the default value. |
| Authentication Type | PAP. |
| Shared Secret | Indicate the shared secret you created in the Protectimus radius.yml file (radius.secret property) when configuring Protectimus RADIUS Server. |
| Server Timeout | Set to 60. |
| Max Attempts | Set to 5. |
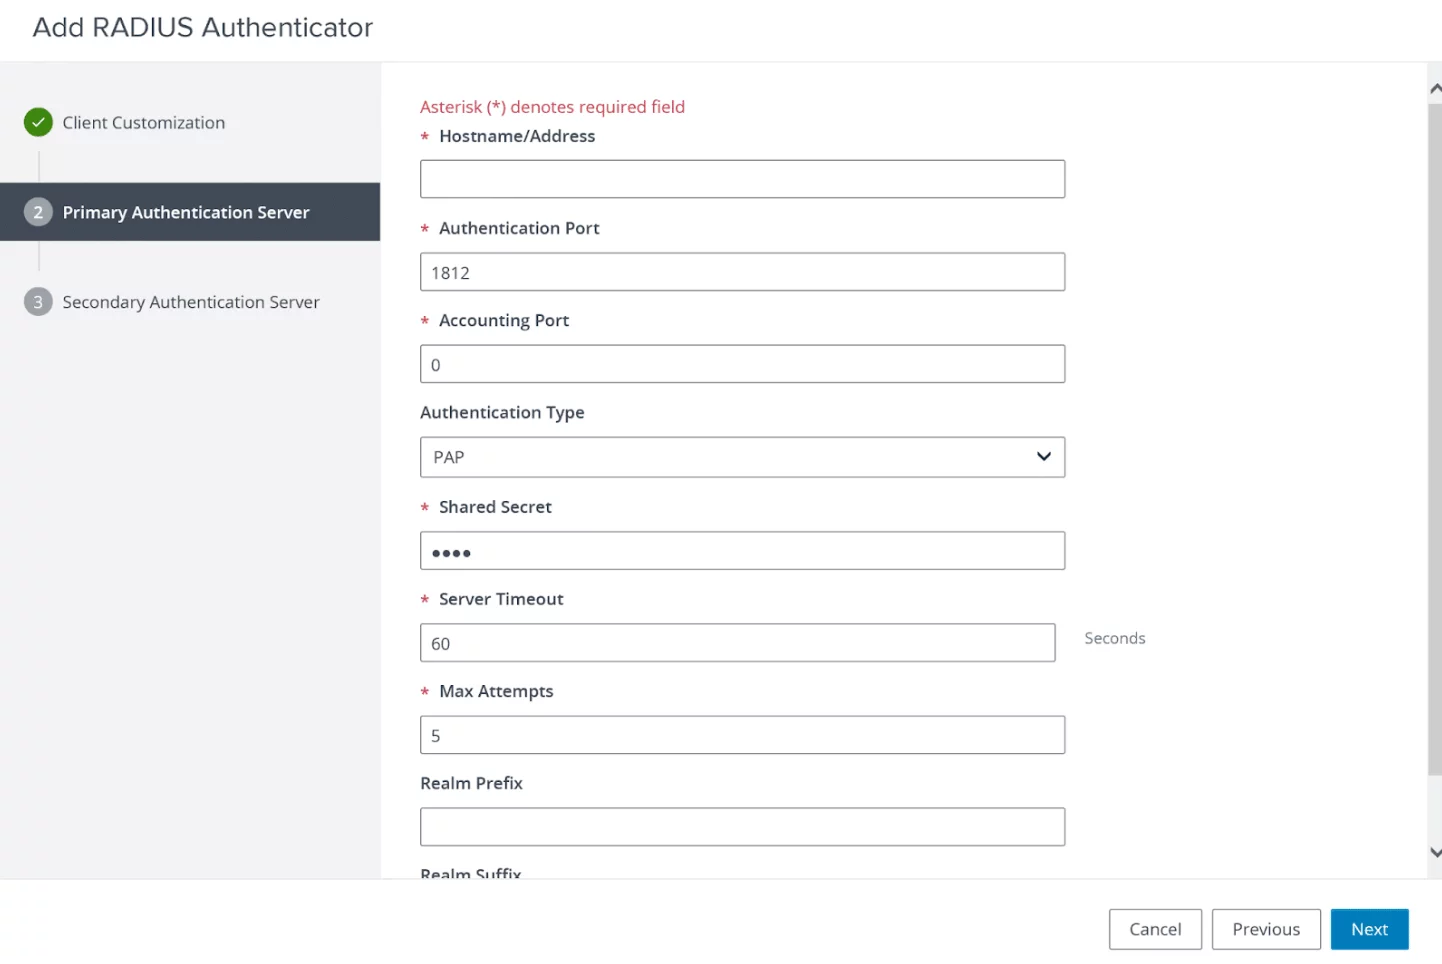
- For all other fields, leave the default values. Then click Next.
- Add a Secondary Authentication Server if you wish (it is optional), and click Finish to complete creating the RADIUS server.
- We recommend you review the Advanced Authentication section:
- check if the RADIUS server you have just created (Protectimus) is selected in the Authenticator dropdown;
- make sure that you have checked the box Enforce 2-factor and Windows user name matching.
Integration of two-factor authentication (2FA/MFA) for your VMware Horizon View 2FA is now complete. If you have other questions, contact Protectimus customer support service.
