Authentication & Verification
Classic 2FA / MFA
MFA for AD, LDAP, Databases
Wi-Fi Authentication
Electronic Visit Verification
Popular Integrations
Popular Integrations
Programmable hardware TOTP token in a card format that fits any authentication system
Classic hardware TOTP token with SHA-1 algorithm support
Programmable hardware TOTP token in a key fob format that fits any authentication system
Classic hardware TOTP token with SHA-256 algorithm support
Programmable hardware TOTP token in a card format that fits any authentication system
Classic hardware TOTP token with SHA-1 algorithm support
Programmable hardware TOTP token in a key fob format that fits any authentication system
Classic hardware TOTP token with SHA-256 algorithm support
A free 2FA authenticator app with cloud backup, easy token transfer to a new phone, PIN and biometric authentication protection
Free OTP delivery with chatbots in messaging apps
Delivery of one-time passwords via SMS messages
Free delivery of one-time passwords via email
Free one-time passwords delivery via push notifications
Get Started
Classic 2FA / MFA
API Documentation
Software Development Kits
Get Started
Classic 2FA / MFA
API Documentation
Software Development Kits
This Cisco Switches 2FA guide shows how to add two-factor authentication for Cisco Switches Login with the help of Protectimus 2FA Service or On-Premise 2FA Platform.
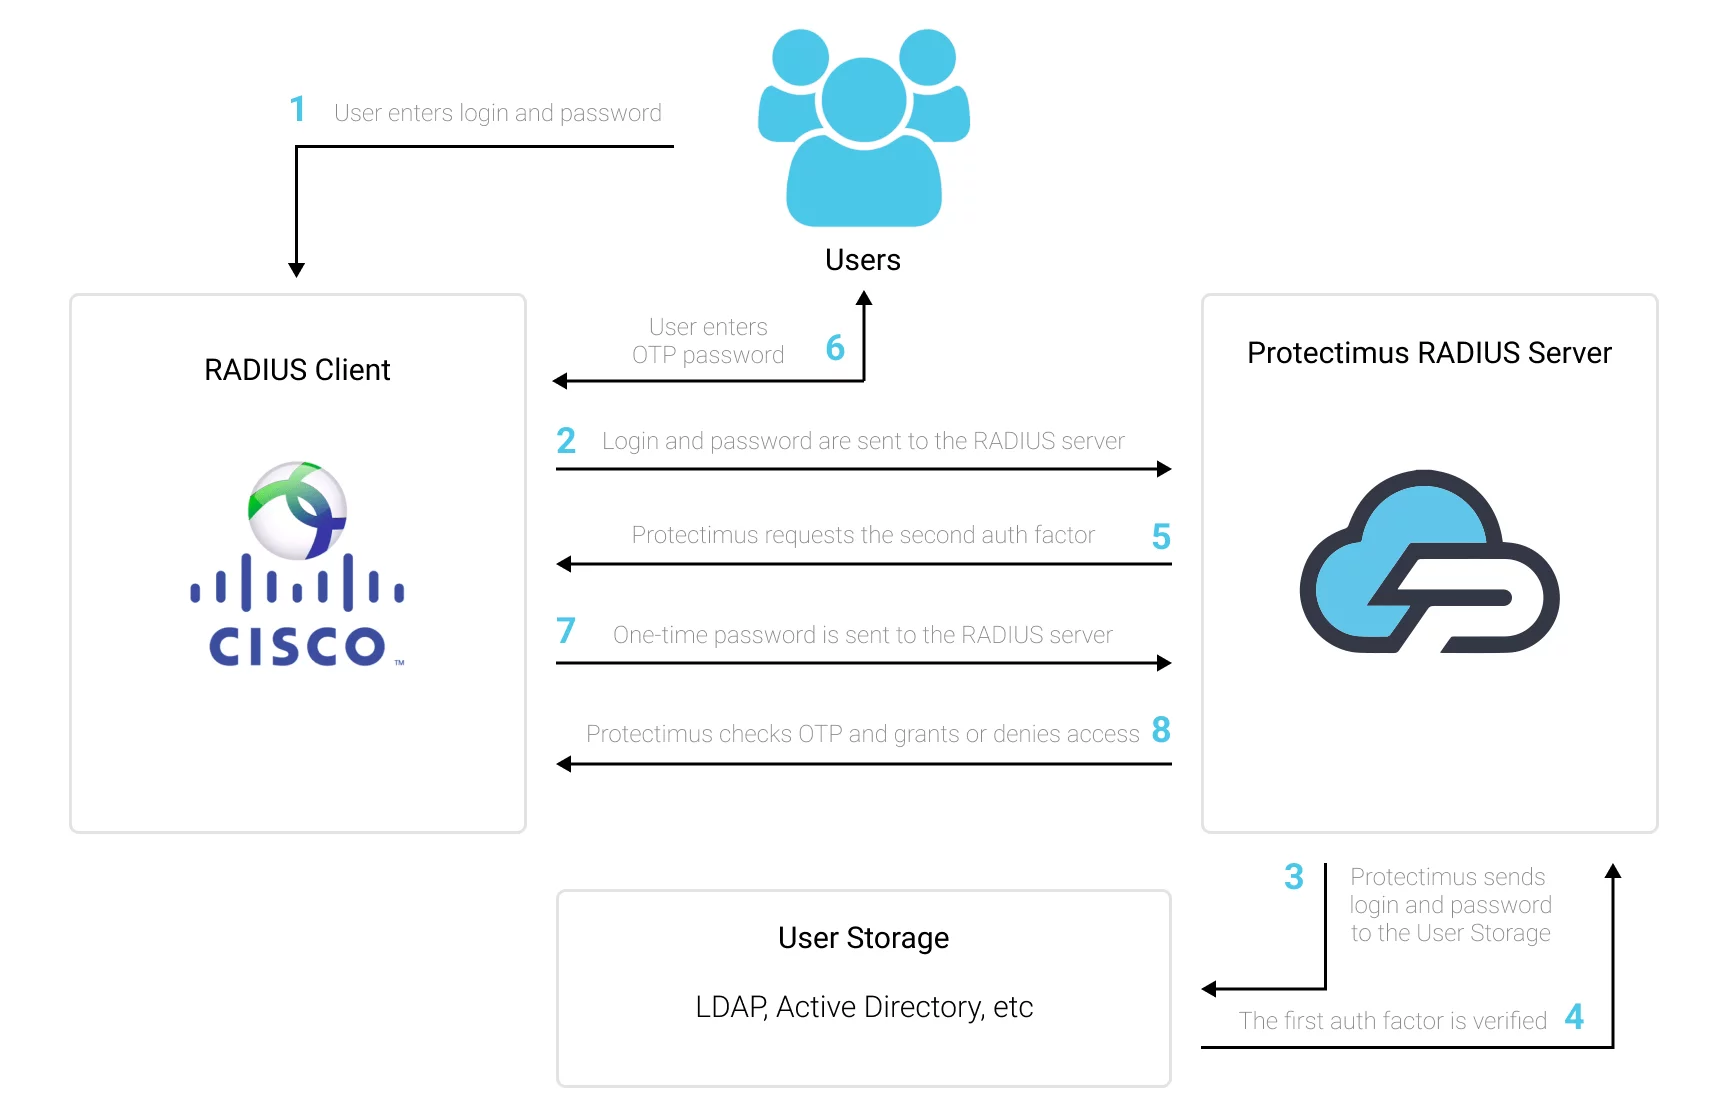
Protectimus two-factor authentication system communicates with Cisco network equipment using the RADIUS protocol. The Protectimus RADIUS Server component acts as a RADIUS server. It accepts incoming authentication requests via the RADIUS protocol, contacts the user storage (Active Directory, etc.) to verify the login and password, and then contacts the Protectimus 2FA server to verify the one-time password. If both authentication factors are correct, the Protectimus RADIUS Server allows the user to login.
The scheme of work of the Protectimus solution for Cisco switches two-factor authentication is shown below.

When you set up two-factor authentication for Cisco Switches, you make your users enter two different factors of authentication when they get access to the Cisco Switch.
After you enable two-factor authentication (2FA) for Cisco Switches login, it becomes too hard to hack it. It’s almost impossible to get both authentication factors at the same time. Moreover, a one-time passcode validity time is only for 30 seconds, so the intruder will have too little time to hack the second factor.
Two-factor authentication (2FA / MFA) is an effective protection measi=ure against such cybersecurity threats like phishing, social emgeneering, brute force, keylogging, MITM attacks, data spoofing, etc.
You can set up Cisco Switches two-factor authentication (2FA) with Protectimus using the RADIUS protocol:
- Get registered with Protectimus SAAS Service or install the On-Premise 2FA Platform and configure basic settings.
- Install and configure Protectimus RADIUS Server.
- Configure Cisco Switches authentication policies.
Detailed instructions for installing and configuring the Protectimus RADIUS Server for Cisco Switches 2-factor authentication using RADIUS are available in our Protectimus RADIUS Server Installation Guide for Cisco Switches 2FA.
Switch(config) #radius server [configuration-name]

Switch(config-radius-server) #address ipv4 hostname [auth-port integer] [acct-port integer]

Switch(config-radius-server) #key [shared-secret]Switch(config) #aaa group server radius [group-name]
Switch(config-sg-radius) #server name [configuration-name]Switch(config) #aaa authentication login [default | list-name] group [group-name] localIntegration of two-factor authentication (2FA/MFA) for your Cisco Switches is now complete.
If you have other questions, contact Protectimus customer support service.
Protectimus Ltd
Carrick house, 49 Fitzwilliam Square,
Dublin D02 N578, Ireland
Ireland: +353 19 014 565
USA: +1 786 796 66 64
Protectimus Ltd
Carrick house, 49 Fitzwilliam Square,
Dublin D02 N578, Ireland
Ireland: +353 19 014 565
USA: +1 786 796 66 64


